↓
 

Quilt Therapy

Saving Sanity through Quilt Therapy - One Stitch at a Time

Quilt Therapy
  • Home
  • About
  • Contact
  • Quilted Kitchen Quilt Blocks
  • On Cloud Nine Quilt Blocks
  • Star Power Quilt Blocks
  • Xmas Quilt Blocks
  • Quilt Notions

Category Archives: Quilt Therapy Lesson

Post navigation

← Previous Post
Next Post→

Mug Rug Day #4 Simple Tutorial

Quilt Therapy Posted on April 4, 2013 by TK HarrisonApril 4, 2013

Since we’ve got a couple of mug rug tutorials under our belt, I have completed the one for today with a lot less photos.   In fact, the only photo I have for you is one of my completed mug rug!

Let’s start with the basics and get that out of way:

  • You need two pieces of fabric (for the front and back) about 6″ – 7″ x 8″ -9″
  • You need a few coordinating scraps
  • A scrap of batting
  1. Cut your front fabric to the size you desire
  2. Cut the back fabric and batting about an inch larger than your front fabric
  3. Using one of the heart shapes below, trace the heart shapes on the back of the coordinating scraps – you will need TWO (2) heart shapes
  4. Either use a fusible web or a temporary spray adhesive to place the hearts on the front fabric
  5. Using a zig-zag or blanket stitch, stitch the hearts to the front fabric
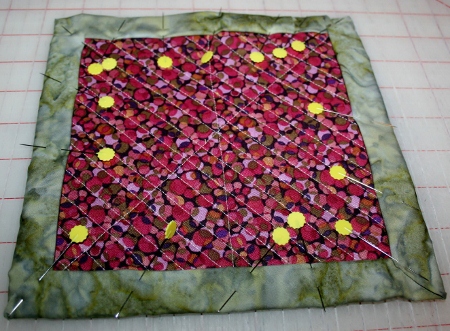
  6. Create your quilt sandwich with the back fabric, batting and front fabric, pinning the three together a few times so they do not move
  7. Quilt the mug rug in whatever quilt pattern you desire
  8. Once quilted, square the mug rug up and using a 2″ x WOF strip, bind the mug rug and then whip-stitch the binding to the back of the mug rug

Here are two different heart shapes you can use as templates.  Click on the image you would like to use and it will open in a new window – then, either save the image to your computer or print it out from the page:

3x3heart

3″ x 3″ heart

4x4heart

4″ x 4″ heart

And – ta-da!  Here is the finished mug rug:

IMG_9702-450

Tomorrow, we will complete our mug rugs with one that combines all of the techniques we’ve used this week!

Posted in Free Quilt Patterns, Mug Rugs, Quilt Therapy Lesson, Quilt-Spiration | 2 Replies

Mug Rug Day #3 Simple Tutorial

Quilt Therapy Posted on April 3, 2013 by TK HarrisonApril 3, 2013

The second mug rug tutorial I’d like to show you is based on a simple quilt block – the Pinwheel.  You can use this technique for any quilt blocks but I seem to make a lot of pinwheels in my quilting adventures so that’s what I made this mug rug out of.  I also happen to have a lot of test blocks in my stash, and any of those blocks would have worked great for this project, too!

First, choose two (or more, especially if you’re using your stash) fabrics and cut them into 10″ squares.  You can make these smaller or larger, depending on what size you want your finished mug rug.  I made mine big because when I started this block, I didn’t know what size I wanted it to end up to be:

IMG_9678 (450x282)

Sew the squares, right sides together, 1/4″ all the way around the edges of the blocks.

IMG_9679 (450x299)

After you have sewn the blocks together, cut them TWO (2) times diagonally, corner-to-corner:

IMG_9680 (450x299)

Next, press your seams toward the darkest fabric to reveal FOUR (4) half-square triangles – and be sure to clip your corners!

IMG_9681 (450x311)

Set your Pinwheel in the correct order and sew two rows of two blocks together and then sew the two rows together.

IMG_9682 (450x263)

Then cut your block down to the size you want it to be – I chose an 8 1/2″ unfinished block with a goal of an 8″ finished block after quilting.

IMG_9684 (450x229)

It’s time to make your quilt sandwich with the backing, batting and Pinwheel block!

IMG_9686 (450x318)

Then quilt your mug rug:

IMG_9687 (450x299)

IMG_9689 (450x313)

Now, square up your mug rug and cut the block it to your desired size:

IMG_9690 (450x331)

Finally, bind your mug rug with a 2″ x WOF strip of coordinating fabric:

IMG_9691 (450x293)

IMG_9692 (450x349)

IMG_9693 (450x331)

IMG_9694 (450x398)

IMG_9697 (450x299)

Stay tuned tomorrow for a bit more challenging mug rug tutorial!

Posted in Free Quilt Patterns, Mug Rugs, Quilt Therapy Lesson, Quilt-Spiration | Leave a reply

Mug Rug Day #2 Simple Tutorial

Quilt Therapy Posted on April 2, 2013 by TK HarrisonApril 2, 2013

Yesterday, I gave you a lot of links to find tutorials and/or patterns to make mug rugs.  Today, I want to put a simple tutorial for you to follow to get in the swing of things.  The mug rug is SUPER SIMPLE, with the hardest part figuring out what size you want to make it!  I decided I wanted to make one that not only held a cup of coffee or tea but also a treat.

I culled some scraps from my scrap shelf and started with five 10″ strips of fabric – with the batiks being 2 1/2″ wide and the pink fabric 3″ wide:

IMG_9659 (299x450)

IMG_9661 (299x450)

IMG_9663 (450x299)

Now it’s time to have some fun!  You can make your mug rug out of the strips you see above, once you square them up.  But I was in the mood for some wonky fun, so I cut my strips on an angle and then squared them up:

IMG_9664 (450x299)

IMG_9665 (450x227) (2)

Now it’s time to put your quilt sandwhich together with batting and backing!

IMG_9666 (450x307)

I set this quilt sandwich up and then put a couple of pins in it so the backing and batting were secured to the top.  Then I got out my marking pen with ruler and drew the quilt lines – using a cross-hatch pattern spaced at 1 1/2″ apart:

IMG_9667 (360x450)

Then I quilted the mug rug on the lines I had drawn:

IMG_9668 (299x450)

Here is a photo of the back of the mug rug, showing clearly the cross-hatch quilting that I planned for the front:

IMG_9669 (450x299)

It’s now time to square up your mug rug and trim the excess fabric and batting away:

IMG_9670 (450x299)

Next, cut your fabric scraps at 2″ x WOF for the binding and sew the binding on it on with a 1/4″ seam allowance:

IMG_9671 (284x450)

IMG_9672 (450x292)

Once the binding is secure, turn your mug rug over and pin the back of the binding so you can whip-stitch and secure the binding to the mug rug:

IMG_9674 (450x298)

Ahhhh, a mug rug fit for a queen! IMG_9675 (450x249)

IMG_9676 (450x300)

Stay tuned tomorrow for a bit more challenging mug rug tutorial!

Posted in Free Quilt Patterns, Mug Rugs, Quilt Therapy Lesson, Quilt-Spiration | 2 Replies

Prayer/Comfort Shawl Blocks

Quilt Therapy Posted on March 21, 2013 by TK HarrisonMarch 20, 2013

I wanted to share the blocks that I made for the comfort shawls I posted about.  I used my EQ7 to re-size the blocks to 15″ finished squares (15 1/2″ unfinished) each, and added a sashing and a 2″ finished border around both of the shawls.

Here are the two blocks I used:

 Kim-400-3 “Jacob’s Ladder” Block

For a 15″ finished (15 1/2″ unfinished) block, these are the cuts for your fabric.  I have three of these on the shawls I made:

  • TEN (10) neutral-colored  3″ squares
  • TEN (10) Green 3″ squares
  • TWO (2) 6″ neutral-colored squares – draw a diagnonal line, corner-to-corner, ONE (1) time on the back of these squres
  • TWO (2) 6″ focus fabric squares

Sew the larger 6″ squares by following the line you drew on the back of the fabric, 1/4″ on EACH SIDE of the line you drew.  Then cut the squares apart ON the line you drew.  Square up the half-square triangles so they are 5 1/2″ square.

Next, just follow the image of the block above to create your nine-patch block!

Kim-450-4“Garden of Eden” Block

For a 15″ finished (15 1/2″ unfinished) block, these are the cuts for your fabric.  I have three of these on the shawls I made:

  • Cut SIXTEEN (16) 3 7/8″ neutral-fabric squares – then cut all of these squares in half diagnonally
  • Cut ONE (1)  3 1/2″ focus fabric squares
  • Cut FOUR (4) 4 3/4″ squares
  • Cut FOUR (4) 3 1/2″ x 5 1/2″ strips

Sew the neutral-fabric triangles to the sides of the larger focus fabric large squares.  Once that is finished, follow the image above to put the rest together – it is technically a nine-patch, so use that as your guide.

The 2″ finished (2 1/2″ unfinished) borders are made from the focus fabric and the binding is made from either the focus fabric or the complimentary fabric.

Enjoy!  These are wonderful to have for friends or family who may need a bit of comfort.

Posted in Church Therapy, Free Quilt Patterns, Quilt Therapy Blocks, Quilt Therapy Lesson, Quilt-Spiration | Leave a reply

More Prayer & Comfort Shawls

Quilt Therapy Posted on March 19, 2013 by TK HarrisonMarch 19, 2013

Last year, a (then) virtual friend I’d met on Facebook (FB) lost a cousin unexpectedly.  Another virtual friend and I said we’d make prayer shawls for the widow, her aunt and uncle and a quilt for the little boy he left behind.

Unfortunately, my MS has been difficult for me to deal with for the past year – hence, I’m a year late (blush) in getting these prayer shawls completed.  I actually made them while I was in Iowa with my FM last summer but could NOT get the motivation to quilt them!  I got to meet Kim and take the shawl tops to her but said I’d get them back to her once they were quilted and ready to go.

When my FM came in January, she warned me that she was not bringing any of her own projects down and that I had better have enough things for her to do to keep her busy.  Of course, once I gave her my to-do list, my husband piped up that I was obviously setting up a sweat shop.  🙂

My FM hand-quilted the two shawls, then I put the binding on them and she whip-stitched the back of the binding – then I made the tags and she blind-stitched them to the backs of the shawls!

Because of the religious preference of the recipients, we called these comfort shawls instead of prayer shawls.  They were designed using three Jacob’s Ladder quilt blocks and two Garden of Eden quilt blocks, though the blocks on my shawls are a larger size than the blocks from the website indicated.

IMG_9549

KimPrayerShawls

It looks like I’d better get a few more of them ready so the next intended recipient doesn’t have to wait a year on me getting more made!

Posted in Church Therapy, Family History, Living with Multiple Sclerosis, Quilt Therapy Lesson, Quilt-Spiration, Quiltalicious Patterns | 3 Replies

Post navigation

← Previous Post
Next Post→

Please Visit our Sponsors!

Abbi May's Quilt Shop - Where Quilt Fabric is Always 10% off Retail Prices!

Additional Links

  • Terms & Conditions
  • Privacy Policy
Quilt Therapy's Amazon Associates Disclaimer

©2006-Present ~ All Rights Reserved ~ QuiltTherapy.com
All original photographs and/or images on QuiltTherapy.com are copyrighted by QuiltTherapy.com. The photographs and/or images that are not copyrighted by QuiltTherapy.com are copyrighted by their original owners and are duly noted, if possible.

Privacy Policy
↑
 

Loading Comments...